

Here in New York, finding the perfect apartment is an almost futile quest. Unless you’re one of the lucky few—we all know that one person who somehow happened upon a gem, with hardwood floors, an updated kitchen, tasteful light fixtures, and a working fireplace to boot—chances are you’ll end up wanting to change at least one thing about your apartment. (I love the big windows and tall ceilings of my Manhattan rental, but I curse the brown laminate kitchen cabinets every time I walk by.)
But we’ve learned that you don’t have to just live with the cards you’re dealt, even if your landlord won’t allow large-scale changes: There are plenty of small, easy, reversible swaps that make a bigger difference than you’d think. Half of the Remodelista team rents, and we know from experience: Alexa created a kit of better light fixtures, outlet covers, and hardware that she carts with her from apartment to apartment. Kristina took the unsightly doors off of her closet in her Harlem apartment late one night (both to remove an eyesore and for easier access). In her San Francisco flat, Meredith removed and stowed away the standard-issue window blinds and swapped out the rusted metal forced-air grates with plain wood ones from Home Depot.
Take it from us: small swaps make a difference. Here are 23 small, on-a-budget changes, most of which take less than an hour, all of which can be reversed with ease when it’s time to move out (and get your security deposit back).
Fix Up the Kitchen
In a rental, the kitchen is often the area where the most can go wrong design-wise, and chances are you can’t rip it out and start fresh. A few, no-impact swaps to get you through.
1. Lay new countertops right on top of the old.
 Above: If you hate the countertops that came with your place, take an idea from designer C. S. Valentin and lay a new countertop material right on top. Valentin opted for a length of cork repurposed from an Ikea Sinnerlig table but a length of marble or butcherblock would also work well. See At Home with C. S. Valentin: French Eclecticism in Cobble Hill, Brooklyn for more. (And note also: the cloth covering the under-counter storage.)
 Above: Another countertop cover-up: Sarah Lonsdale had plywood covers cut to fit over the existing countertops in her West Coast rental. When she moves out, they can be easily lifted off and packed away. See Sarah’s Refined Rental in St. Helena, CA for more.
2. Swap knobs for ultra-DIY leather pulls.
 Above: A Remodelista favorite, and one that is proof that the smallest changes can make the biggest difference: swapping less-than-desirable cabinet pulls. We like DIY leather pulls, like these simple knotted versions in Sarah’s Refined Rental; for a more polished version, see DIY Video: How to Make a $20 Cabinet Pull for $2.
3. Wrap pulls in tape.
 Above: Or, wrap cabinet pulls in tape (these, in Rental Rehab: The DIY New York Apartment, are wrapped in textured blue duct tape cut with an X-Acto knife); rope or cloth could also work.
4. Take off the cabinet doors.
 Above: If it’s the cabinet fronts themselves you don’t like, take off the doors and stash them away so you can find (and replace) them easily when it’s time to move out. This works well for upper cabinets, where you’re more likely to have artful ceramics and glassware on display; cabinets that stash food and packaging are best kept under wraps (see below for a way of concealing these). Photograph from Small-Space Solutions: 17 Affordable Tips from an NYC Creative Couple.
5. Hang fabric (or even pretty tea towels) in place of cabinet fronts.
 Above: If you’re not ready to go for the completely open look, tack pretty lengths of cloth in place of cabinet doors. In Done/Undone with Clarisse Demory in Paris, Demory removed her Ikea cabinet fronts and hung blue tea towels instead. “It’s less cold, less artificial this way,” she says.
6. Build a temporary backsplash.
 Above: If you don’t have upper cabinets and want to add some storage (and drama), consider building a removable plywood backsplash that can be carted with you to the next place. Read on in Kitchen Upgrade: The Low-Cost DIY Black Backsplash, and see Remodeling 101: 6 Budget Backsplash Hacks for more ways of creating a backsplash on a budget (or covering an unsightly one).
7. Invest in custom fronts.
 Above: If you know your cabinets are Ikea, and if you’re planning on being in your apartment for the long haul, consider investing in custom cabinet fronts that fit onto Ikea boxes. See Ikea Kitchen Upgrade: 8 Custom Cabinet Companies for the Ultimate Kitchen Hack for a few of our favorites. Photograph from Ikea Upgrade: The SemiHandmade Kitchen Remodel.
Transform Outdated Light Fixtures
A rental with acceptable light fixtures is a rarity. (Here at Remodelista, we’re always wishing that landlords would just outfit apartments with The Hardware Store Porcelain Light Socket—it’s inexpensive, versatile, and timeless.) Enlist these hacks until they catch on.
1. Swap out a front-and-center fixture with something more appealing.
 Above: A simple switch with a big impact: If you can, swap out an existing light fixture (or cover a bare bulb) with a fixture you can bring with you from rental to rental. (Just keep the original fixture somewhere so you can replace it before you go.) Here, designer Paige Geffen swapped an existing fixture for the Terra Surface from Cedar & Moss in her kitchen. See The LA Rental, Upgraded: Designer Paige Geffen’s 500-Square-Foot Challenge for more.
2. Or, add a statement shade right over the old fixture.
 Above: Hide an unappealing light fixture with a more attractive shade that will cover the whole thing. Here, designer C. S. Valentin used Ikea’s [product id="996030"]Sinnerlig Bamboo Shade[/product] to cover up an unsightly fixture; see At Home with C. S. Valentin: French Eclecticism in Cobble Hill, Brooklyn for more.
3. Replace exposed bulbs with artful versions.
 Above: For a fixture with exposed bulbs, swap just the bulbs out, like Sarah did in her LA rental: “I removed the milky glass shades on the light above the mirror and replaced them with silver-tipped light bulbs, which not only look better but also provide nicer light,” she says. See Expert Advice: 10 Tips for Transforming a Rental Bath for more of her ideas.
Upgrade the Bathroom
If you’re like most of us and inherit a rental bathroom in serious need of an upgrade, try these ideas.
1. Swap out standard-issue shower curtain rings.
 Above: Another place where leather ties come in handy: as shower curtain holders, instead of standard-issue plastic rings. Sarah made the swap in her own bathroom; see Expert Advice: 10 Tips for Transforming a Rental Bath.
2. Switch the mirror.
 Above: Alexa reports that she took down the ugly mirror in her Brooklyn rental bath and replaced it with a more attractive version—it took some elbow grease, she says, but was worth it. (The original mirror is currently under her bed.) If the mirror is removable, replacing it with something of your own choice makes a big difference. Here an antique mirror doesn’t even need to be hung; see House Call: 50 Shades of Weathered White in Hudson, NY, from Zio & Sons.
3. Wrap exposed fixtures in rope.
 Above: Don’t like the look of ugly, rusted pipes under the sink? Wrap them in rope, as seen at Urban Cowboy: A Williamsburg Clubhouse for Nomads.
4. Snap on removable tiles.
 Above: For tired walls or ugly tile, invest in removable tiles that can be stuck or snapped on (and travel with you when you go). We like these Tiles for Commitment Phobes, shown here in a bathroom in a polyurethane finish (for use in moist areas).
Cover Bad Flooring
Here are some ways to cover up less-than-desirable floors.
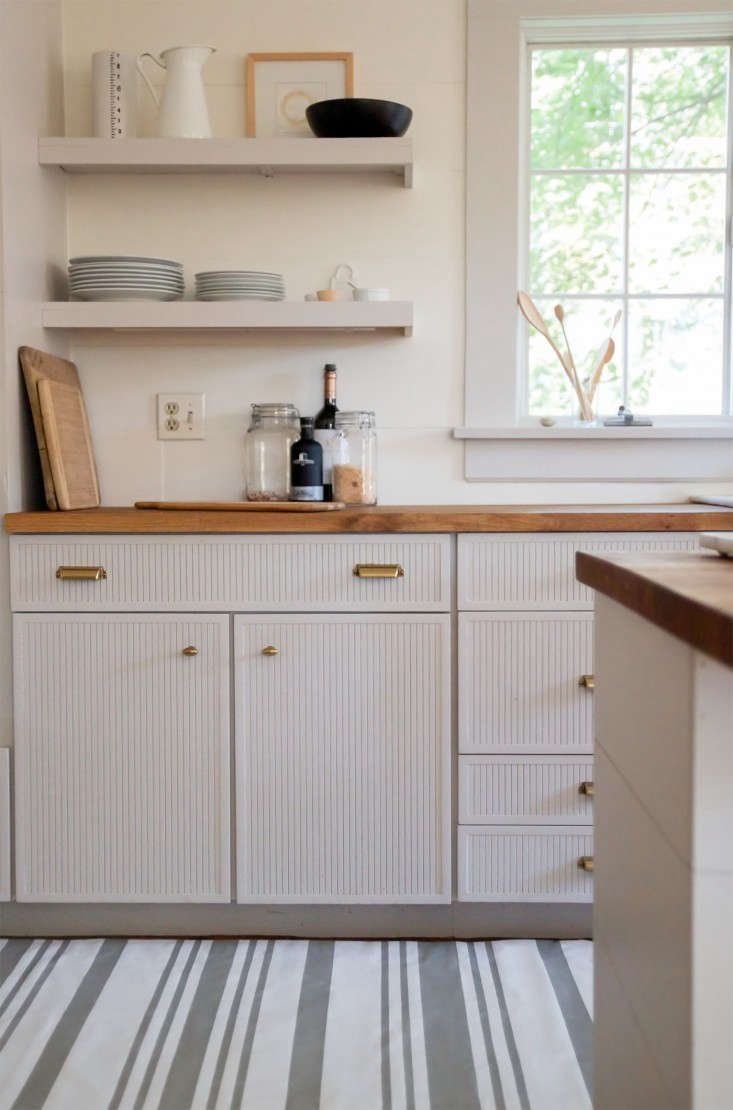
1. Layer boards or painted plywood, cut to fit, on top.
 Above: If you can’t tear out the flooring and start fresh, create a new layer on top. In Sarah’s Refined Rental in St. Helena, CA , she had a tongue-and-groove oak floor cut to fit and “floated” it over the linoleum that came with the kitchen. “It transformed the space, and we were able to pull it off while keeping the original kitchen intact,” she says. When you move, it can be removed with no permanent damage to the floor underneath.
 Above: Another version of the same idea: plywood, cut to fit, shown here in Christine’s bathroom. (She painted it for added polish.) See Remodeling 101: Painted Plywood—The Best Budget Wood Floor for the full story.
2. Source, or create, an artful floor covering.
 Above: The oldest (and most budget-friendly) trick in the book: covering ugly flooring with rugs. When Justine enlisted Jersey Ice Cream Co. to upgrade her kitchen, redoing the floors was not in the budget. Her solution? Covering them, wall-to-wall, with washable Swedish floorcloths. See how in DIY: The Swedish-Striped Canvas Floorcloth.
Disguise Exposed Utilities
Here are some tricks to disguise unsightly fixtures.
1. Paint utility fixtures.
 Above: Exposed pipes and heaters? Consider painting them for an almost sculptural effect. Shown here: a pink-hued heating tower in Kristina Line’s Brooklyn apartment becomes a curious focal point, rather than an eyesore. (Before, “it was a boring brownish color,” she says.) You might want to check with your landlord before painting since, unlike walls, it might not be possible to get an appliance or fixture back to its original color. Photograph from A Two-Week, $1,000, 500-Square-Foot Rental Overhaul by a Design Student in Bushwick, Brooklyn.
2. Wrap steam pipes in rope.
 Above: For a more reversible, more textured cover-up, wrap exposed pipes in sturdy rope, as seen in Le Mary Celeste: Coastal Cool in the Middle of the Marais. It’s an effective solution for the steam pipes that run through most New York City apartments—and prevents burns if you accidentally touch the hot pipe, too.
Divide Your Space
If you live in a smaller space than you’d like, one of these simple changes can help divide it.
1. Paint a “room.”
 Above: To create the illusion of a “room” in an open space, paint a section or an alcove, making sure to stop abruptly where you want the “room” to end. Shown here: the kitchen in Kristina Line’s Brooklyn one-bedroom (and note how she built out a small plywood partition to complete the alcove.) See more in A Two-Week, $1,000, 500-Square-Foot Rental Overhaul by a Design Student in Bushwick, Brooklyn (and, again, you might want to check with your landlord before painting).
2. Use a bookshelf as a divider.
 Above: To create the feel of a separate, private bedroom in a one-room apartment, enlist a tall, study bookshelf, as designer Karin Montgomery Spath did in this New Zealand studio. It feels almost like a complete wall but can be packed in the moving van (and repurposed elsewhere if you move to a bigger place). See A Glamorous Studio Apartment in Auckland that Feels Like a One-Bedroom, Hack Edition; photograph by Matthew Williams.
3. Add a rolling rack and a curtain.
 Above: For a softer divider, we like the idea of curtains, but hanging one from the ceiling requires hardware and drilling holes. For less impact, try this hack from shopowner Makié Yahagi’s Manhattan apartment: a rolling rack (hers is from Ted-Steel Industries) hung with [product id="1001534"]Roller Shower Curtain Rings[/product]and [product id="933845"]Riktig Hooks[/product] from Ikea and a pretty curtain (she used a [product id="1001536"]Selena Washed Linen Flat Sheet[/product] from Caravane). See Shop Owner Makié Yahagi’s Charm-Filled Loft in SoHo, New York; photograph by Matthew Williams.
Cover Bare Walls
A solution for bare apartment walls, and renters (or commitment phobes) who don’t want to hammer nails in:
1. Hang photos (and storage) from the molding.
 Above: If you’re lucky enough to have molding in your apartment, use it to hang artwork (or extra storage), as Sarah did here with an S-hook and a length of string. Photograph from Sarah’s Refined Rental in St. Helena, CA.
2. Or, lean art and mirrors on the floor.
 Above: No need to hang art if you’re not ready (or if you have a cement or brick wall that makes it hard to hang things). It looks just as intentional when leaned thoughtfully against the wall or on a ledge. Photograph from House Call: 50 Shades of Weathered White in Hudson, NY, from Zio & Sons.
 Above: Mirrors, too. Photograph from Living Large in 675 Square Feet, Brooklyn Edition.
More ideas for the rental apartment:
- Expert Advice: The Ultimate Rental Checklist, Landlord Edition
- A Two-Week, $1,000, 500-Square-Foot Rental Overhaul by a Design Student in Bushwick, Brooklyn
- At Home with C. S. Valentin: French Eclecticism in Cobble Hill, Brooklyn
- Inside a Netflix Star’s LA Bungalow, Budget Rental Secrets Included
- ‘Own’ It Like You Own It: 8 Ways to Personalize Your Rental, Designer Edition
N.B.: This post is an update; the original story ran on March 23. 2018.