

If you are a fan of experimenting and doing different projects, then you will love this functional vacuum cleaner made from waste materials. It’s an awesome idea by Navin Khambhala #crazyNK on Youtube. This allows you to get creative and discover how this machine works. Read on and learn how to make a vacuum cleaner using a bottle.
Materials:
- plastic bottle
- mini motor
- old spray can
- cutter or utility knife
- pair of scissors
- small saw
- ruler
- marker
- hammer
- nail
- clay
- epoxy
- thick double adhesive tape
- wire
- cloth filter
- Styrofoam
- tube
Instructions:
Step 1:
Remove the label of the plastic bottle and cut it just above the middle using a cutter or utility knife. Once done, cut the upper part just below the cone part. Use a pair of scissors to clean the edges. Remove the middle part as you will only be using the top and bottom parts of the bottle.
Step 2:
Be safe when doing this, make sure that the can is empty. Remove the pressure before opening. Cut the bottom and top of the spray can, cut in the middle, and flatten it making a rectangle. Mark the upper circle of the bottom part of the plastic bottle onto the rectangular sheet. Cut the circle using a sharp pair of scissors and divide it into quarters using a marker and ruler. Hammer the nail in the middle to create a hole. Once done, make a small circle in the middle and start cutting it into 8 blades. Do not cut all the way, end on the small circle. Next, twist each blade slightly to make a fan.

Step 3:
Put some clay on the front and back middle of the fan and insert the motor. Drill some holes in the feet of the plastic bottle. Then create a hole on the cap for the wires of the motor. Put some glue on the bottom part of the motor and attach the cap.
Step 4:
Place the fan on the bottom of the bottle and insert the wire into one of the holes. Put 2 layers of thick double adhesive tape on the top of the bottom bottle.
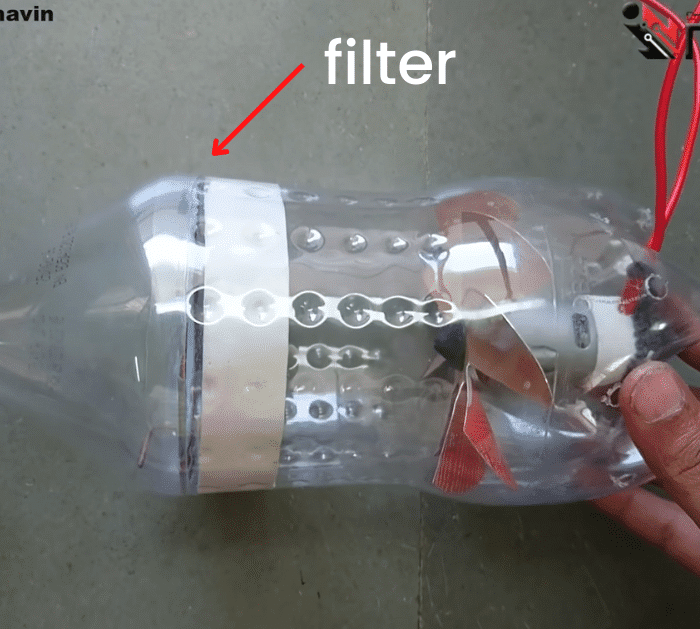
Step 5:
Make a circle using a wire with a hook that can be inserted into the bottle. Glue the cloth filter. Insert it into the bottle and attach the upper part of the bottle.
Step 6:
Use styrofoam to create the handles and stand. Once done, insert the tube into the mouth of the bottle and glue. Cut the collar of one extra bottle and glue it to the inside of the neck. Decorate your vacuum cleaner. Attach to power and you now have a DIY vacuum cleaner.
How to Make a Vacuum Cleaner Using a Bottle
The post How to Make a Vacuum Cleaner Using a Bottle appeared first on DIY Joy.